
Welcome back to this installment of my personal journey toward narrating and producing the audiobook of my own published books Hooray for Pain! and With It or in It. Today, I am going to detail the steps that I’ve come up with, hopefully in enough of a non-technical way that it will be reasonably easy to follow and understand for anyone who is trying this themselves for the first time.
As I mentioned in my last entry, I wanted to try to reduce the number of applications in my toolchain, as well as simplify the process in other ways. My aim was to try to get to the point where I could use only the free tool Audacity. I have found, however, that Audacity has some interface issues that make it very difficult for me to use for the editing stage of the process, and so I have to record & edit the audio in Sound Studio before moving into Audacity for most of the filtering.
To make this a little simpler, I basically see this as a three-step process:
- Record the audio
- Edit out the mistakes
- Filter & enhance the remainder
- Noise Reduction
- Compression
- Limiting
- Click Removal
- Ducking
- Equalization
- or Treble/Bass reduction or increase
- Echo or Reverb
So, based on my experimentation and output results so far, this is my workflow. Please note that this has not yet been submitted to ACX, and even if it had I can’t guarantee your results will be the same, but this setup should at least get you on the right track.
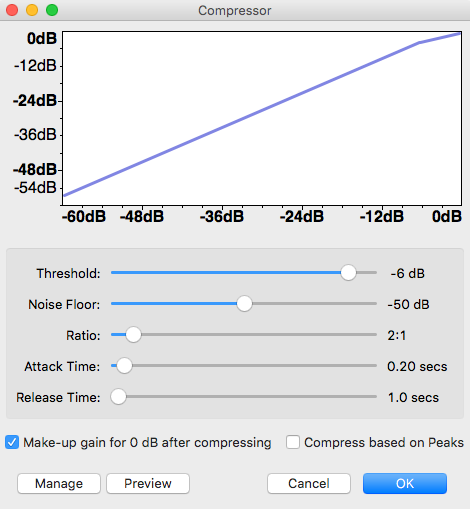 |
| My Compressor settings in Audacity |
and click OK to start the process. It only takes a few seconds. What compression does in this context is, essentially, it brings the valleys up and the peaks down so the overall range of sound levels (called the dynamic range) is tighter (that is, it decreases the dynamic range, essentially squishing it together a bit). This allows the sound to be able to be amplified more without distortion or clipping (both of which would sound horrible in this context). By also clicking the “Make-up gain” checkbox, the compressor will perform an amplification of the resulting audio, increasing its overall signal. Now, the noise floor slider is something you will likely want to play around with; I have found that in my setup, -50 guarantees that all of my vocals will be picked up (and not clipped), but that it won’t trigger on other noises that might be present (like the A/C kicking on, for example). Yours might be different, but I suggest setting it no lower than the ACX noise floor of -60, and you will likely want it higher than that.
When the compressor finishes, the resulting sound file is quite a bit louder, but the peaks of it (at 0 dB) are too loud for ACX (which requires a max of -3 dB). So my next step is to run a Limiter on the file:
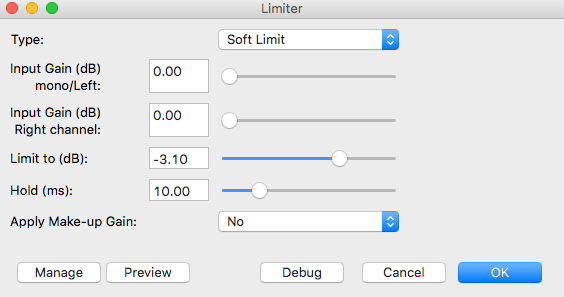 |
| My Limiter settings in Audacity |
What a limiter does kind of depends on the type selected. A “limit” (hard or soft) will compress any sound peaks that go above the “Limit to” setting so that they don’t breach that Limit; a “clip” will cut the sound off if it goes higher than that Limit. By setting a “soft” limit, as the sound approaches the Limit it will be progressively diminished, more diminished the higher it goes. It will start to diminish those peaks before it reaches the Limit, which results in more softly rounded peaks. A “hard” limit will not diminish the peak until it breaches that Limit, and then will compress it, resulting in a more flattened peak. The Clip settings will distort the sound, especially the “hard” clipping, and I don’t recommend it for this purpose (though, you may find through your own experimentation that it works for your situation). The soft limit gently rounds off the peaks, and at -3.1 dB will keep them below the threshold for ACX.
Next, I run the Click Removal, which helps to eliminate any stray lip smacking or sharp breath noises I might have made while recording.
At this point, I stop and listen to the entire piece from beginning to end. If I hear any lip-smacks or breathing noise that the Click Removal didn’t catch, I will stop and select a few milliseconds before and after the noise, and then duck the audio. Essentially, what that means is that on only the selected audio, I decrease its amplitude so that it is no longer audible on normal listening. (Technically, ducking is when you decrease the sound of a given track below that of other audio present, but the process is the same whether there is other audio present or not, so that’s what I’m going with.)
Once I’ve gotten through the entire file and removed as much of the distracting breathing and lip noise as I can identify, I give it another listen. This time, I’m listening for the balance of treble & bass tone. If it sounds too tinny, I’ll use the equalizer to adjust the relative balance of bass, mid tones, and treble sounds. Conversely, if it’s too bass-rich, I’ll equalize in the other direction. Some software will have specialized equalizer filters for Bass or Treble Enhance (or Reduce), and you can experiment with those to hear how it sounds.
In addition, there’s a consideration for reverberation or reverb settings. Initially, I was using a tool in Final Cut called a doubler, which essentially just provides a perfect duplicate of the selected sound only a few milliseconds later (Audacity calls this effect Echo), and has basically the same effect, providing some additional depth to the sound. Reverb essentially takes the sound and uses mathematics to simulate what that sound might be if it were bouncing off of different substances in different sizes of location. The essential difference between echo (or doubler) and reverb is that the echo simply duplicates the sound, with a delay (how long between the original and echoed sound) and a decay (how much of the original sound is reproduced in the repeated signal, each time it is repeated). Any decay below 1 will reduce the sound for each echo, and a very small decay (such as .05, say) will result in the sound quickly dying out. The reverb will simulate the echoed sound being bounced around inside a room of a size you specify (numeric size, not square feet), and has a lot more options to consider. I have experimented with it and have found that a straight echo with a delay of 0.05 second, and a decay of 0.05, gives my vocal recordings more richness without the obviousness of reverberation. However, I encourage you to experiment and find your own settings (and, share them below if you are inspired to do so)!
One thing to keep in mind: if you decide you want to use echo or reverb, I recommend doing it before you apply the limiter, or set your original limiter a bit lower (say, -3.5 or -3.8 dB). The echo or reverb effect may increase the peaks, and if so it may pop you over the ACX submission threshold.
Finally, the last thing I do is run the ACX check on the file. Here is the output from that for my latest recording file:
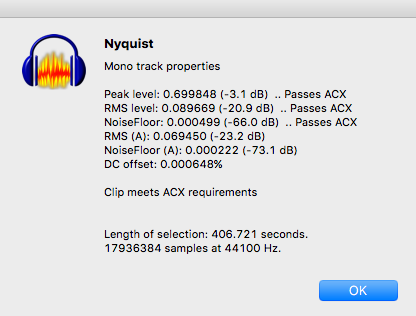 |
| Output from the ACX Check analysis |
As you might expect, this tool is very handy but is not a guarantee that the file will pass ACX once submitted, it just gives you a sense of where it stands. I believe that this will probably work fine most of the time, however, so I am definitely using it at least as a baseline.
Now, at this point sometimes there are special effects that need to be considered. For example, in one part of With It or in It, I included a paraphrased transmission that was sent over military radio frequencies to our unit on a gunnery range. After recording the audio, I saved the file as an AIFF file and import it into Final Cut (since I couldn’t find a plug-in for Audacity that performed this), where I applied the “Car Radio” filter to just that section of the recording. It made that section sound like it was being transmitted over the radio, which was exactly the effect I was looking for. Once done, I exported that file back out as an AIFF and opened it in Audacity to re-check with the ACX Check tool, just to make sure I hadn’t messed up the floor or peak levels (mostly; this section was only a few seconds and was unlikely to affect the RMS level significantly).
Once this part has been completed, I recommend sending this file to a trusted friend (or a solid beta reader/listener, if you have one willing to help) for a second set of ears. It especially helps if they are familiar with your book, but this is not strictly necessary. Ask them for their feedback on the overall sound, any distortion, clipping, or distractions that may be present that you missed, and overall flow. Sometimes, you will discover that you thought you cut out a mistake but didn’t, or that you accidentally skipped a word, sentence, or paragraph (or, accidentally cut them out).
Finally, when you are ready to submit to ACX (if you are going this route), you’ll need to save the finished file as an MP3 file, with a bit rate of at least 192 bps, Constant Bit Rate, and as a mono file if you can (or a stereo if you can’t, but do not create a “joint stereo” if your software gives you that option).
So, that’s where I am right now with this workflow. During the rest of the week (in addition to other things) I will be working on getting up those videos I discussed before, which hopefully will help elucidate any unclear areas. Let me know what you think by leaving a comment below!